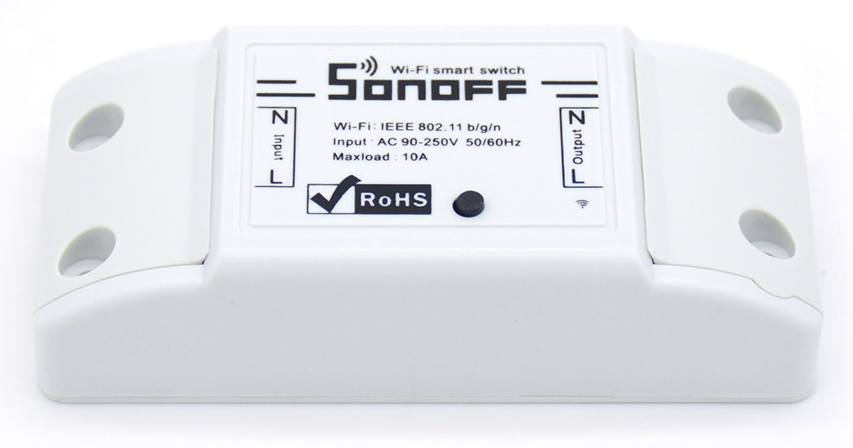
Sonoff, a (smart) wifi switch, which you can buy for appr. 6 dollars on several Chinese websites. Sonoff is a cost effective smart home solution designed and produced by ITEAD. It’s a ESP8266 based WiFi wireless switch that can connect to appliance of different types and brands.
Standard it will be delivered with a Chinese app, which means the ‘cloud’ is necessary to operate this device. I don’t like the cloud when it comes to control and or monitor my smart home. I did a search on the internet en some guys were able to flash the ‘esp easy’ firmware to it 🙂
Do a search on Youtube like “sonoff esp easy” and you will find many tutorials how to accomplish this.
What do you need?
- Sonoff R1 (wifi only, I don’t have the version with RF 433 Mhz)
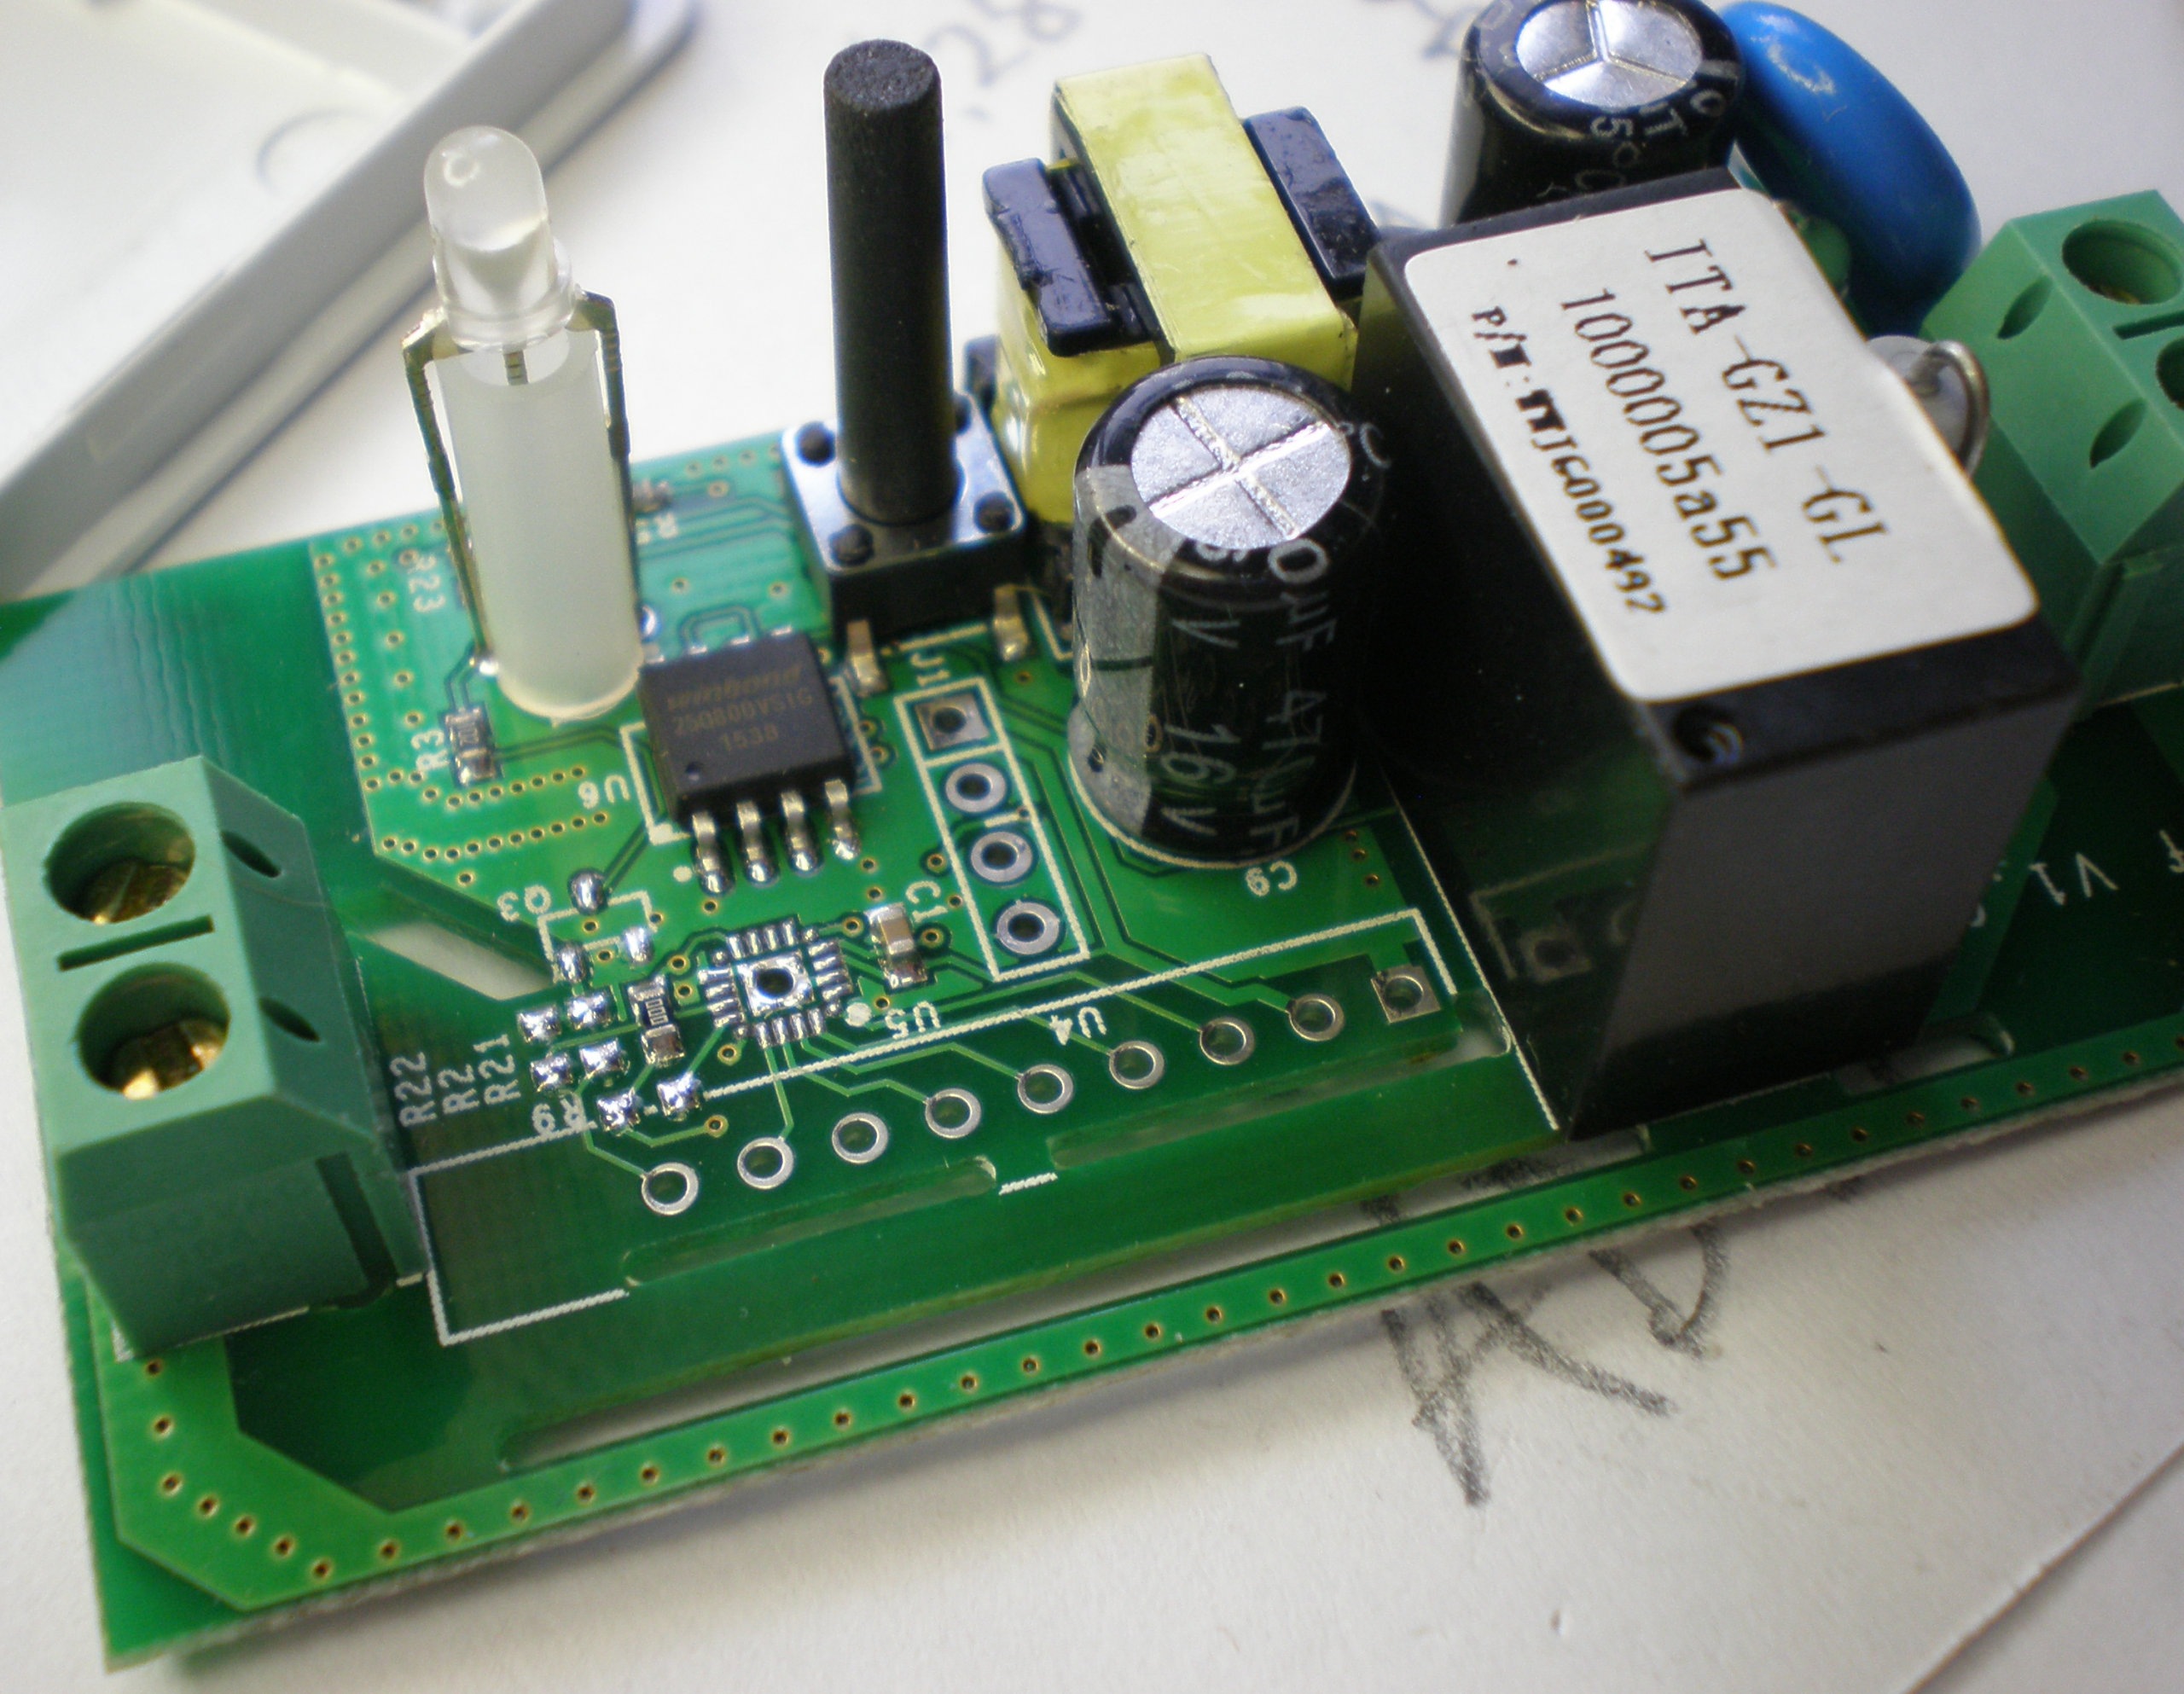
- Solder headers (male or female, it’s up to you). Those are not delivered with the Sonoff, but you have to solder at least 4 headers to the pcb
- USB-TTL converter ( CP2102 serial converter chip) 6 pins TTL connector for 3,3V, RST,TXD, RXD, GND and 5V.
- At least 4 jumper wires to connect the Sonoff headers to the USB_TTL (which are male connectors)
I’ve connected the USB-TTL converter – without any wires connected- once to my computer, so I was sure the device is recognised correctly, and a COM-port was visible in device manager.
Connecting wires
Connect the jumper wires between the Sonoff and the USB-TTL converter as following:
Sonoff (up to down) wire setting:
- Red: 3.3V
- Purple: RX
- Yellow: TX
- Black: GND
- Empty: GPIO 14
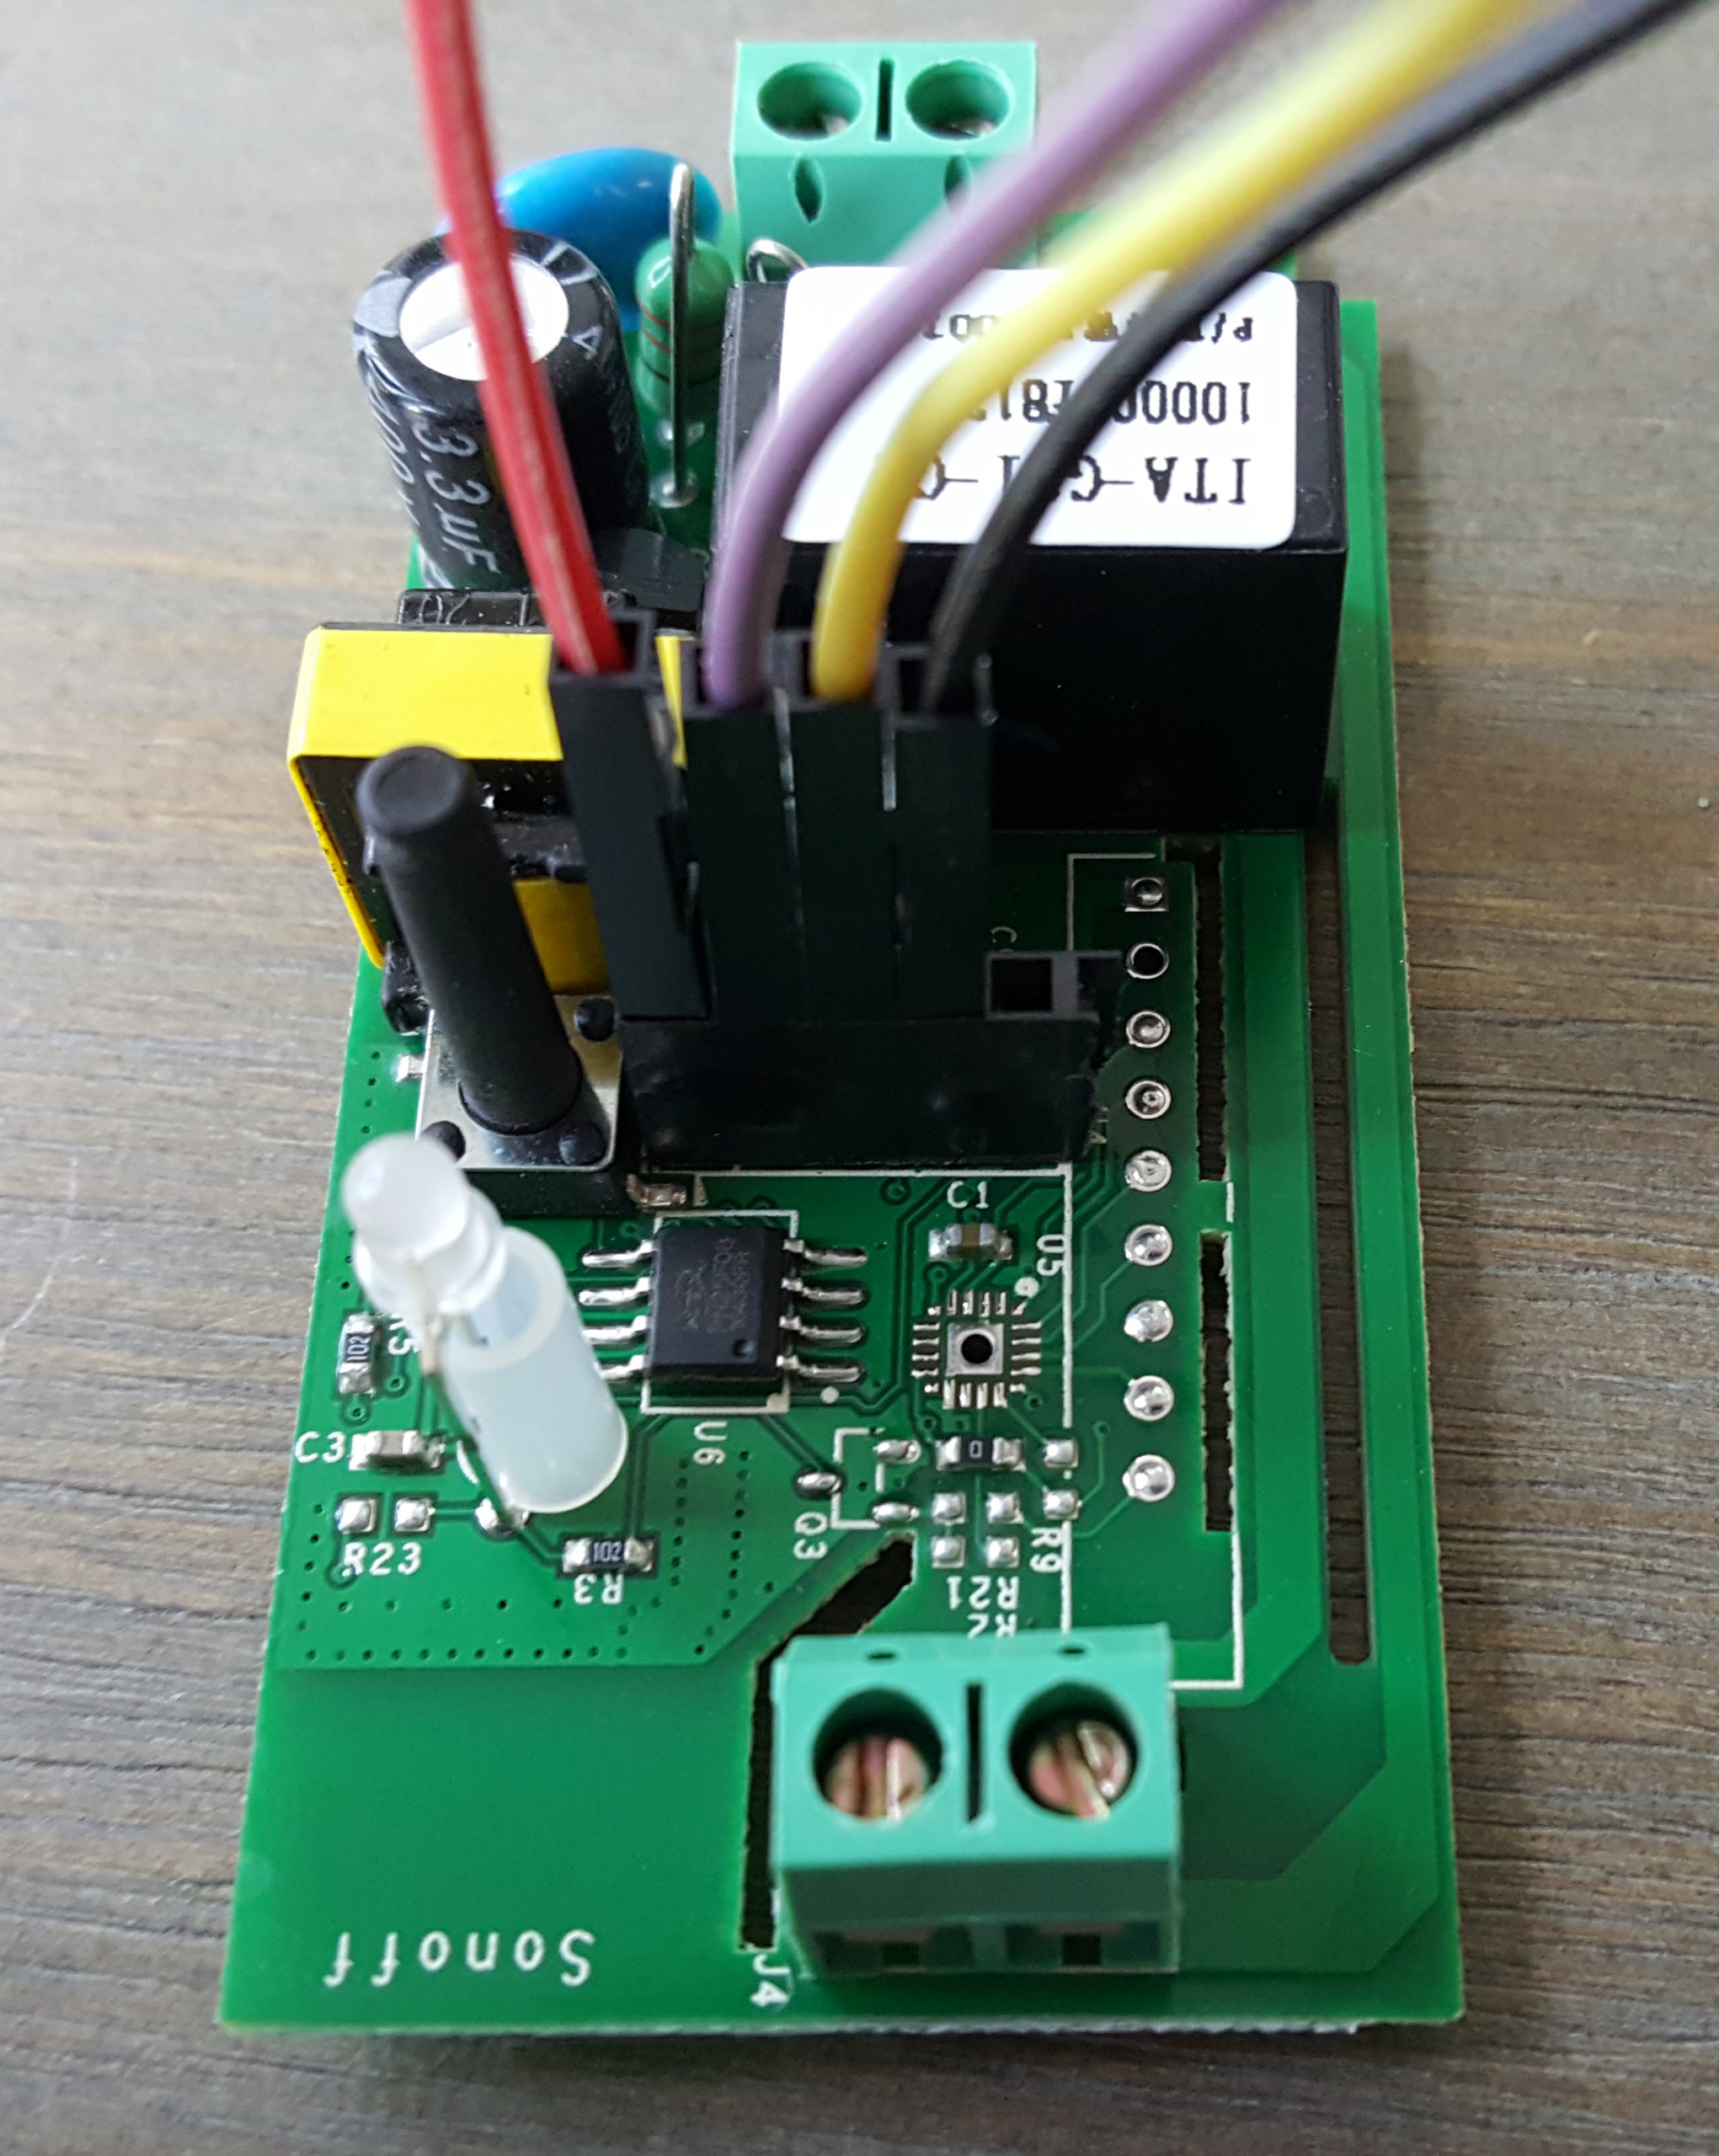
In the most online tutorials the jumperwires are in different order, but in my case the purple and yellow are switched, (This is explaned there too. If flashing the firmware is not working, you have to switch the RX/TX wires, in my case the yellow and purple wires).
USB-TTL converter (up to down) wire setting:
- Red: 3.3V
- Purple: TXD
- Yellow: RXD
- Black: GND

Be sure the 4 wires are connected correctly between the 2 devices.
Flashing firmware
While holding down the button on the Sonoff (long black pin next to led), connect the USB to your computer.
Once it’s connected, you can release the Sonoff button. This bring the Sonoff in programming mode.
Download the ESP easy firmware and flash tool on the following website: http://www.letscontrolit.com/wiki/index.php/ESPEasy
When downloading the latest stable firmware version 120, the download included also the flash tool:
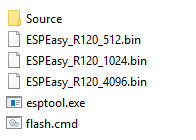
Start “Flash.cmd”.
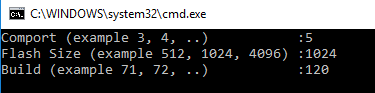
The prompt, will ask 3 questions, which has to be entered, and confirmed with ENTER.
- Comport: in my case 5 (see device manager for the correct one)
- Flash size: 1024
- Build: the firmware version in above overview = 120
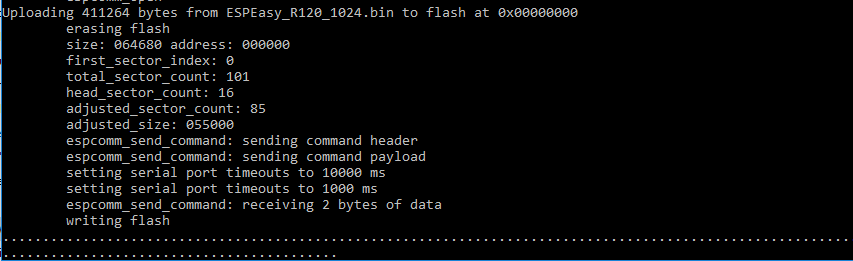
Now the firmware flash procedure will start automatically.
If you receive “connect failed” messages, close the prompt window.
Switch the TX/RX wires on the USB-TTL converter. Leave the 3.3V and GND untouched, so the Sonoff will stay in programming mode.
Once the 2 wires are switched, start the “flash.cmd” again and enter the above values again.
Uploading is started, and many dots will follow at the bottom of the screen:
Finally, “flush is complete” and the command screen can be closed to press any key.
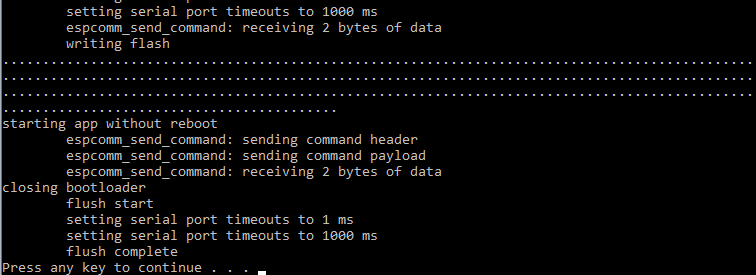
The ESP easy firmware is now successfully flashed on the Sonoff.
The Sonoff is now ready for configuring, via one of the following connections:
- Leave the Sonoff connected via the USB-TTL convert on the PC (unplug and plugin the USB to the computer once, so the Sonoff will reboot)
- Disconnect all jumperwires from the Sonogg and connect it to 230V.
Sonoff configuration
The Sonoff will create it’s own wifi network. Use your phone, tablet, wifi connection to connect to the “esp_0” network. In some cases the new wifi hotspot is not visible, a restart of the Sonoff the device is required. In my case, it’s a matter of reconnecting the USB-TTL device to the pc.
Start your browser on this device and go to a random webpage. Normally it will go directly to the start page of the ESP easy configuration. if not, go to http://192.168.4.1, which is the default page.
Here the available wifi networks are displayed and you have to select your wifi network and add your own wifi password.
Click Save.
The Sonoff will reboot and get an ip address from your router. The same webpage will show you the new ip address of the Sonoff. The device (phone, tablet) will disconnect automatically,
Open the ip address of the Sonoff in your web browser.
On the same website as were you have downloaded the firmware (http://www.letscontrolit.com/wiki/index.php/ESPEasy), you have a tuturial what you can do in it’s setup, but the tutorial below will explain the minimum but necessary configuration.
Basic config
In the next steps, the basic necessary steps are showed, and how to switch the Sonoff via http commands.
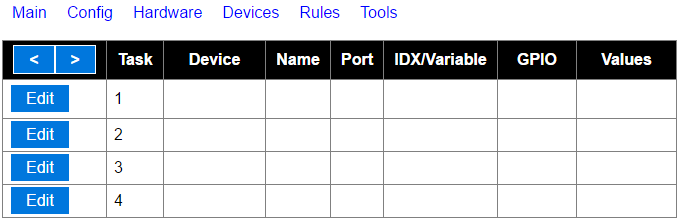
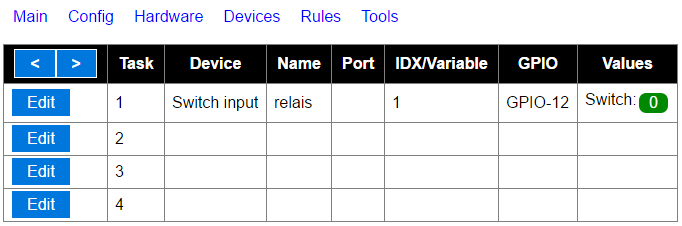
Go to tab “Devices”, you will notice all Tasks are empty.
Click on the first “Edit” button at the first Task (1):
Enter the details below as displayed.
Note: Name can be changed into any name, but you need this name later in a script.
When Ready, Press Submit and Close. The settings are saved now.

The Task is now created as shown below:
Rules
To use tab “Rules”, we need to first activate this option.
Go to tab “Tools” and scroll down to the setting “Rules” and select the checkbox as shown below:

Click at the bottom of the page on “Submit”. You will notice that the tab “Rules” will become visible.
Scripts
Go to tab “Rules”. Here we will define a script, so we can call it via a http command.
A script could be like:
Note: On “name”, this will be called as Event name in the http command.
| On TurnOn do gpio,12,1 EndOn |
| On TurnOff do gpio,12,0 EndOn |
- The http command to switch the Sonoff to On will be: http://<ip-of-Sonoff>/control?cmd=event,TurnOn
- The http command to switch the Sonoff to Off will be: http://<ip-of-Sonoff>/control?cmd=event,TurnOff
Or if you just want to have a toggle switch:
Notes:
- “switchsonoff1” is the name of the script, which will be called via the http command below.
- “relais” is the name of the switch, which is used in the Devices tab, at the earlier created Task1.
| On switchsonoff1 do if [relais#Switch]=1 gpio,12,0 else gpio,12,1 endif EndOn |
The http command to switch the Sonoff on/off, will be: http://<ip-of-Sonoff>/control?cmd=event,switchsonoff1
You can have mutiple scripts in the same Rules tab.
Specifications
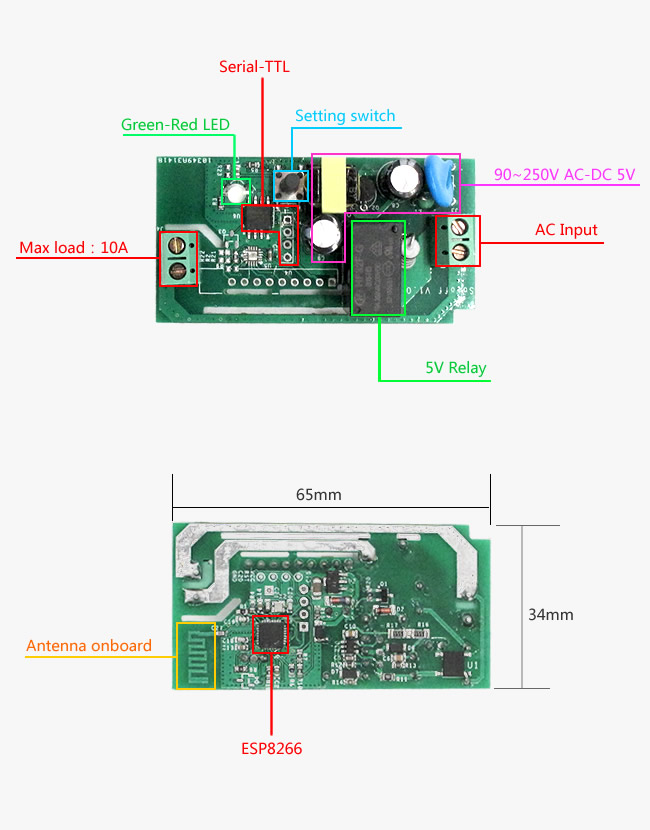
- Voltage range: 90-250v AC(50/60Hz)
- Max current: 10A
- Max Wattage: 2200 watts
- Dimensions: (L)88*(W)38*(H)23mm
- Color: White
- Humidity: 5%-95%
- Wireless Frequency: 2.4Ghz
- Working Temp: ﹣20℃-75℃
Link to datasheet: http://dl.itead.cc/IM151116002/0A-ESP8266_Specifications_v4.1.pdf
************** Update 15-02-2017 **************
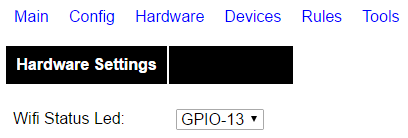
Activate led
Select in tab “Hardware” at “Wifi Status Led” from the dropdown menu the option “GPIO-13”.
Activate physical button
To control the Sonoff via the black button on top of the case, add the following configuration:
Add a new device via tab “Devices”, with the following parameters:
(The IDX/Var could be any digit)

In tab “Rules”, add the following script:
Notes:
- “button” is the name of the task, which is created in tab “Devices”
- “state” is the value name in the created task.
| on button#state do if [button#state]=0 gpio,12,0 gpio,13,1 else gpio,12,1 gpio,13,0 endif endon |
When pressing the button on the Sonoff, the internal relais will be controlled, including the led.
Example: When the light is switched on (=GPIO 12), the led(=GPIO13) will be switched on too (green color).

Hello, i have made this with sonoff 4ch but when i try to connect to the wifi esp_0 i need a password.
What is this password?
Thank you so much
SSID ESP_Easy_0 or ESP_0
password: configesp
IP addr: 192.168.4.1
Thank you for the detailed instructions!
I have another (newer?) version of the Sonoff basic, Sonoff R2 v1.0, and managed to get it working by flashing the normal_ESP8285_1M.bin image using ESP_Easy_flasher.
Also, I used an YP-02 rs232 to TTL module because I have one. It uses a CH340 chip so it needs to have the CH341 driver installed before connecting.
This module only provides a 5V supply so I routed this via a small 5V=>3.3V (AMS1117 chip) converter pcb to the Sonoff.
Connect Tx from the converter to Rx of the Sonoff and Rx of the converter to Tx of the Sonoff.
Because I wrongly flashed the first Sonoff with the wrong image (normal_ESP8266_1M.bin), I flashed it again with a blank image (blank_1MB.bin), reset it bij briefly taking the 3.3V away and flashing it again, now with the proper image.
Hopefully this will be of use to someone.
Could you tell me where to download the sources?
Maybe switch to Shelly1 ??
Just flash Tasmota with Arduino and all works fine, in Domoticz as well.
Did 5 of them today, all R2, no probs
The Sonoff Basic from the Chinese company iTead is a cheap module: on Chinese websites like Banggood.com and AliExpress.com you can find them for around five euros.
By default you use them with an app from iTead, but by installing new firmware on the microcontroller you make the device open for your own systems. That is what we are going to do in this DIY. The device appears to be based on an ESP8266 microcontroller and we know what to do with it.
Grocery list
– Sonoff Basic WiFi Switch; approx. € 5 on Banggood.com
– 3.3 volt usb-to-ttl break-out board (or serial cable); € 2 on Banggood.com
– 5-pin male pinheader
– 4 female-to-female jumperwires
– Soldering iron and soldering tin
Total costs: approx. € 7, –
Preparing Arduino IDE / Flashing Sonoff Basic
In order to flash the firmware on the Sonoff Basic, we work with the Arduino IDE, which supports the ESP8266 in addition to the Arduino microcontrollers. To get started with the ESP8266 in the Arduino IDE, you first need to enable the support. To do this, open the File / Preferences menu and enter the url http://arduino.esp8266.com/stable/package_esp8266com_index.json in Additional Board Manage URLs.
Confirm with OK at the bottom and restart the Arduino IDE. Then open the Board Management in the Tools / Board menu. Search there on esp and install esp8266.
In the Tools / Board: for Generic ESP8266 Module menu, set the Flash Mode to DOUT and the Flash Size to 1M (64K SPIFFS) (also via the Tools menu).
Then download the zip file from GitHub with the source code of the Tasmota firmware (https://github.com/arendst/sonoff-tasmota/releases) and extract it. Copy the sonoff directory to the Arduino directory in your home directory and the contents of the lib directory to the Arduino \ libraries directory. Open the sonoff.ino file in the Arduino \ sonoff directory in the Arduino IDE and click the check mark at the top left to verify that the code compiles correctly. If so, then it’s time to prepare the hardware!
Open the Sonoff module and connect pins
Open the housing of the Sonoff module by pushing a screwdriver in the split next to the green screw terminal until the plate at the bottom comes loose. That way you break the warranty label (at least, we suspect that it is, something is printed on it).
In the middle, right next to the 470 μF capacitor, you see five holes in the PCB (see image ## left / right / bottom / top ##). You do not use the hole furthest from the button. The other four are (from closest to the button to further from the button) 3.3 V, RX, TX and GND.
Make sure that your USB-to-TTL cable puts 3.3 volts on the pins, not only for the I / O pins, but also for the voltage pin. On some usb-to-ttl break-out boards you can set this with a jumper on the right pins.
Some cables have four colored wires: red = 3.3 V, black = GND, white = RX and green = TX. At a break-out sign you look at the indications at the pins. Now connect the pins as shown in the table opposite.
To connect the pins reliably, you have to solder a header on the holes in the circuit board of the Sonoff Basic WiFi switch.
If you do not want to make that effort, try to push the jumperwires of the usb-to-ttl cable slightly diagonally into the holes of the Sonoff Basic so that they make contact. But that did not work reliably enough for us, so we took the trouble to solder the header on the Sonoff Basic.
Firmware flash
First open the user_config.h file of the Sonoff code for some settings in the Arduino IDE. Remove the two comment marks (//) from the line
#define PROJECT “sonoff”
replace “sonoff” with the name of your project (and the quotes will stay there). Give each Sonoff module in your house a unique name. You define your Wi-Fi network in STA_SSID1 and your Wi-Fi password in STA_PASS1. You can also define a second Wi-Fi network. These are the most important amendments. The other you can always change later.
Save your changes, press (and hold) the button on the Sonoff PCB and press the wires on the PCB. Then connect the usb-to-ttl cable to your computer and release the pressed button after a few seconds. The Sonoff sign is now in flash mode.
Check the Arduino IDE for the correct serial port. You can see this at the bottom right or in the Tools / Port menu. If necessary, change the port in that menu. Finally click on the arrow next to the check mark at the top left to start flashing.
If you have not soldered a pinheader, keep the wires on the Sonoff PCB all the time. If the firmware is correctly flashed, you will see 100% on the bottom of the Arduino IDE console and the green LED on the Sonoff module will flash once. You can now remove the usb-to-ttl cable.
If LED keeps blinking, go to IP address of just flashed Sonoff, configuration, configure other and uncheck MQTT enable.
If you want to control your sonoff S20 with ESPEasy firmware using your Android smartphone, go to apkfiles.com and search for and install ESPEasy Switch Controller. It is free and add free.
Hi Rutg3r, i flashed the basic v2 basic with the latest firmware with the normal procedure. No errors. It look likes the device reboots after a few seconds so i cant connect to the wifi. When i monitor the device in Realterm i see in the logs rst cause:4, boot mode 3,7. (And again and again)
Any idea what the problem is?
Thank you
Hi Arjan,
I’m not able at all to flash an Sonoff R(elease)2 via the standard procedure and I failed in doing that via soldering the extra wire. Besides this, I never got a behaviour as you described, so I don’t have a cause nor solution for this.
Kind regards,
Rutg3r
I’m having a similar problem, I believe. Excerpt from the serial console when trying to connect over the wifi. (Access point shows up and I can join).
load 0x4010f000, len 1384, room 16
tail 8
chksum 0x2d
csum 0x2d
vbb28d4a3
~ld
00:00:00 Project sonoff Sonoff Version 6.4.1(classic)-2_4_2
00:00:00 WIF: WPSConfig failed to start
00:00:04 APP: Restarting
ets Jan 8 2013,rst cause:1, boot mode:(3,7)
load 0x4010f000, len 1384, room 16
tail 8
chksum 0x2d
csum 0x2d
vbb28d4a3
~ld
00:00:00 Project sonoff Sonoff Version 6.4.1(classic)-2_4_2
00:00:00 WIF: WPSConfig failed to start
Hello,
Can you please list the tools and hardware used in your tutorial, so we make sure we have everything right before trying to attempt this ?
Thanks
Hi Chris,
You can find it below the section “What do you need?“. I’ll not mention a soldering iron or what so ever. Be ware also that you have the R1 (release 1) of the Sonoff. Newer ones, like the R2 will not work in first place with this tutorial because an extra wire has to be attached to the pcb. An alternative can be found here: https://www.rutg3r.com/electrodragon-wifi-iot-relay-board-firmware-change-to-espeasy/
Hi rutg3r,
Any idea how to flash the sonoff r2 ?
I did try everything, i cant get it in flash mode.
Regards
Hi Malosa.
I tried, twice, but failed because you need to solder a wire to a specific little component on the pcb, before you can flash the R2 versions of the Sonoff. Another cheap and easier solution is explained in a different blogpost of mine: https://www.rutg3r.com/electrodragon-wifi-iot-relay-board-firmware-change-to-espeasy.
[…] header pins is used. For flashing you need a 3.3Volt FTDI programmer, which is explained in the https://www.rutg3r.com/sonoff-firmware-tutorial-to-esp-easy/ post as well, you may use this tutorial as a reference for flashing the ElectroDragon to the […]
Great tutorial, thx.
One comment:
In the current version R120 of ESPeasy, in order to activate the Rules tab there is one step missing, namely in the Tools Tab go system /Advanced. There you can find the tic box to activate the rules tab.
And for the flashing, I faced an issue at first, but after first flashing with a different version and then again doing the same but with the R120 version, I finally got it to work. Although I still do not know why, but now it is working fine.
Hopefully this helps other people that facing the same issue as I did at first. 😉
Hey, thanks for the good tutorial. I tried flashing a Sonoff Basic R2 and ran into the following two problems:
1. Random results and errors while not using external 3.3V for flashing. Finally I followed this advice ( https://www.letscontrolit.com/wiki/index.php/Basics:_Connecting_and_flashing_the_ESP8266#A_word_about_power_supplies ) and used the cabling guide from https://www.iot-experiments.com/flashing-esp8266-esp01/ to get reproducable results.
2. “Activate led” broke functioning of R120 and R148 for me: ESPEasy seems to work on my device including the activation of the led using rules and the button on the device. But when I activate GPIO13 as wifi led in the ESPEasy setup the device disconnects from wlan. Eventually it reconnects for a few seconds and loses connection again. This repeats again and again in an interval of a minute or two. Resetting the device to factory settings (by shorting RX and TX while powering up) solves the problem and it is possible to configure the device again.
Hi Chris, This tuorial is created for older Sonoff versions, but I’ll purchase soon some new ones and I hope it will be done as flawless as the tutorial.
nice tutorial! Pls is it possible for one espeasy configured device to control another espeasy configured device?
Tnx for the feedback Francis. It should be possible in the “Rules” section of the Espeasy software to set a http call, see: https://www.letscontrolit.com/wiki/index.php/Tutorial_Rules#SendToHTTP. Please let me know if this fit your needs. I personally don’t have a http call setup like this, but will use my HA system to do the other actions.
On info@sonoff.nl a lot of dutch informatie https://www.sonoff.nl
There is no information there… it’s just spam for a webshop.
[…] prepare Sonnof for flashing – see this tutorial – part Connecting wires. b) download custom FW Tahoma. c) configure Arduino IDE d) flash […]
This tutorial finally helped me getting my Sonoff switch to work. Thanks1
Hi M,
tnx for the feedback.
Use NodeMCU Flasher:
32 Bit > https://github.com/nodemcu/nodemcu-flasher/blob/master/Win32/Release/ESP8266Flasher.exe
64 Bit > https://github.com/nodemcu/nodemcu-flasher/blob/master/Win64/Release/ESP8266Flasher.exe
Make sure to have following settings to flash correctly:
Baud Rate: 115200
Flash Size: 1M Byte
Flash Speed: 40 MHz
SPI Mode: DOUT
You can also set your sonoff back to factory defaults using below settings on Config tab:
INTERNAL://BLANK 0x7E000
INTERNAL://FLASH 0x00000
INTERNAL://IROM 0x40000
INTERNAL://DEFAULT 0x7C000
this will work for most of sonoff products
can’ get it working no wifi after flahing, also arduino software is not helping
Make sure to have following settings to flash correctly:
Baud Rate: 115200
Flash Size: 1M Byte
Flash Speed: 40 MHz
SPI Mode: DOUT
The button didn’t work i had to change button#state to button#switch
on button#switch do
if [button#switch]=0
gpio,12,0
gpio,13,1
else
gpio,12,1
gpio,13,0
endif
endon
hi rutger,
Is it possible to use the pwm feature for the 230v output? So i can connect (dimable led) bulbs to it and dim it with the pwm command?
Hello Wouter,
I’m 99% sure that dimming a led is not working for the Sonoff type I described in my blog post. Itead have a led dimming solution available, but I can’t find the dimmer itself on internet for sale yet: https://www.itead.cc/sonoff-led.html
Kind regards,
Rutg3r
dont work with … “Sonoff Basic” (THv1.1) – 2017-5-5, Ive try every flash program and every .bins on 1st n 2nd n 3rd no way get it working anymore… hmm ?? any suggeust? i check on the chip it “esp8266ex”?
Hi Anthony,
I can’t find “..ex” on my chip, nor on the pcb.
Check the post of “Pauliussss” on https://github.com/arendst/Sonoff-Tasmota/issues/463#issuecomment-347095617. Maybe it helps in a different way?
Hi Rutg3r,
I have the same issue like “Anthony Straw”, same board version and same (+EX) chipnumber and tried also every flash possibility.
It won’t work unfortunalaty.
Evert
Hello Rutg3r
excellent tutorial.
Thank you very much.
Hello
A great tutorial helped me a lot.
Greeting
Thank you very much for this great tutorial.
Sorry for my poor english.
I read also rule tutorial but I cannot do what I want.
I want :
1) during boot, blinking relay, and finish by GPIO,12,0
2) use switchsonoff with html command
3) use switchsonoff with button
4) use Clock but I do not understand how I can I setup date and time without %system% and without ethernet/wifi/internet access.
I have several devices, maybe is it possible to reduce then ?
Today I write a lot of rule, one for each action, but they are “same”.
Is it possible to create 2 functions and call then ?
Some thing like this :
On TurnOn do
gpio,12,1
gpio,13,0
EndOn
On TurnOff do
gpio,12,0
gpio,13,1
EndOn
On System#Boot do
TurnOn
timerSet,1,10
EndOn
On Rules#Timer=1 do
switchsonoff
timerSet,1,10
EndOn
On button#state do // press button
switchsonoff
EndOn
On switchsonoff do // call by http:///control?cmd=event,switchsonoff
if [relais#Switch]=1
TurnOf
else
TurnOn
endif
EndOn
On Clock#Time=All,18:25 do
TurnOn
EndOn
On Clock#Time=All,12:25 do
TurnOff
EndOn
When I use control?cmd=event,switchsonoff or turnOn or turnOff, generally wait 2 sec take effect, and I need be patient 5 sec to do it again.
When I press button, it is worst, generally wait 8 sec take effect, and I need be patient 13 sec to do it again.
Have I a problem ? If no problem, how can I do to blink led during this time wainting ?
When status of relais or button change, how can I return it on html web page ?
When I update firmware I loose device, rule and esp.css. I can load esp.css and device, but not rule. Have you an idea ?
About css, I write mine in WebServer.ino and add “label for” in list of first step, scan and show access points within reach…
////////////////////////////////////////////////////////////
This is my rule
On TurnOn do
gpio,12,1
gpio,13,0
EndOn
On TurnOff do
gpio,12,0
gpio,13,1
EndOn
On System#Boot do
gpio,12,1
gpio,13,0
timerSet,1,1
EndOn
On Rules#Timer=1 do
if [relais#Switch]=1
gpio,12,0
gpio,13,1
endif
EndOn
On button#state do
if [relais#Switch]=1
gpio,12,0
gpio,13,1
else
gpio,12,1
gpio,13,0
endif
EndOn
On switchsonoff do
if [relais#Switch]=1
gpio,12,0
gpio,13,1
else
gpio,12,1
gpio,13,0
endif
EndOn
////////////////////////////////////////////////////////////
This is log from serial
INIT : Booting Build nr:120
WIFI : Connecting… 1
WIFI : Connected!
INIT : I2C
INIT : Boot OK
INIT : Normal boot
EVENT: System#Boot
ACT : gpio,12,1
SW : GPIO 12 Set to 1
ACT : gpio,13,0
SW : GPIO 13 Set to 0
ACT : timerSet,1,1
SW : State 1
EVENT: relais#Switch=1.00
HTTP : connection failed
EVENT: Rules#Timer=1
ACT : gpio,12,0
SW : GPIO 12 Set to 0
ACT : gpio,13,1
SW : GPIO 13 Set to 1
ACT :
SW : State 0
EVENT: relais#Switch=0.00
HTTP : connection failed
WD : Uptime 0 ConnectFailures 2 FreeMem 28808
SW : State 0
EVENT: button#state=0.00
ACT : gpio,12,1
SW : GPIO 12 Set to 1
ACT : gpio,13,0
SW : GPIO 13 Set to 0
HTTP : connection failed
SW : State 1
EVENT: relais#Switch=1.00
HTTP : connection failed
SW : State 1
EVENT: button#state=1.00
ACT : gpio,12,0
SW : GPIO 12 Set to 0
ACT : gpio,13,1
SW : GPIO 13 Set to 1
HTTP : connection failed
WD : Uptime 1 ConnectFailures 5 FreeMem 28792
SW : State 0
EVENT: relais#Switch=0.00
HTTP : connection failed
SW : State 0
EVENT: button#state=0.00
ACT : gpio,12,1
SW : GPIO 12 Set to 1
ACT : gpio,13,0
SW : GPIO 13 Set to 0
HTTP : connection failed
SW : State 1
EVENT: relais#Switch=1.00
HTTP : connection failed
WD : Uptime 1 ConnectFailures 8 FreeMem 28776
WD : Uptime 2 ConnectFailures 8 FreeMem 28760
EVENT: switchsonoff
ACT : gpio,12,0
SW : GPIO 12 Set to 0
ACT : gpio,13,1
SW : GPIO 13 Set to 1
SW : State 0
EVENT: relais#Switch=0.00
HTTP : connection failed
WD : Uptime 2 ConnectFailures 9 FreeMem 28512
EVENT: switchsonoff
ACT : gpio,12,1
SW : GPIO 12 Set to 1
ACT : gpio,13,0
SW : GPIO 13 Set to 0
SW : State 1
EVENT: relais#Switch=1.00
HTTP : connection failed
WD : Uptime 3 ConnectFailures 10 FreeMem 28552
EVENT: turnOff
ACT : gpio,12,0
SW : GPIO 12 Set to 0
ACT : gpio,13,1
SW : GPIO 13 Set to 1
SW : State 0
EVENT: relais#Switch=0.00
HTTP : connection failed
EVENT: turnOn
ACT : gpio,12,1
SW : GPIO 12 Set to 1
ACT : gpio,13,0
SW : GPIO 13 Set to 0
SW : State 1
EVENT: relais#Switch=1.00
HTTP : connection failed
WD : Uptime 3 ConnectFailures 14 FreeMem 28536
EVENT: switchsonoff
ACT : gpio,12,0
SW : GPIO 12 Set to 0
ACT : gpio,13,1
SW : GPIO 13 Set to 1
SW : State 0
EVENT: relais#Switch=0.00
HTTP : connection failed
EVENT: switchsonoff
ACT : gpio,12,1
SW : GPIO 12 Set to 1
ACT : gpio,13,0
SW : GPIO 13 Set to 0
SW : State 1
EVENT: relais#Switch=1.00
HTTP : connection failed
EVENT: switchsonoff
ACT : gpio,12,0
SW : GPIO 12 Set to 0
ACT : gpio,13,1
SW : GPIO 13 Set to 1
SW : State 0
EVENT: relais#Switch=0.00
HTTP : connection failed
WD : Uptime 4 ConnectFailures 17 FreeMem 28488
Hi rutg3r,
Thank you for your excellent explanation. (Not yet “perfect” though ;-))
If it is ok, I’ve got some remarks&questions:
1) Your printscreen of “Activate physical button” is the same as in “Basic config”!
Respondent Bond Keevil mentioned this earlier.
Respondent Adrien reported a nice link showing a second device-task (“Button, GPIO-0, Push Button Active High, State”).
2) I’ve got the physical button “Button#State” working.
But the button does not combine nicely with “switchsonoff1”&“TurnOn”&“TurnOff”.
I mean; ideal would be that any combination of software-switching or hardware(=button)-switching would take effect.
But is doen’t. Even if I try including a “gpio,0,0-or-1” in “switchsonoff1”&“TurnOn”&“TurnOff”. I’m al a loss here.
3) Do you know why “gpio,13,1” turns the led off? I would have expected that “1 means On and 0 means Off” .
Btw, it’s nice to include led-on/off in your rules: switchsonoff1, TurnOn and TurnOff.
4) I think it is possible to turn the led on for a few seconds while the sonoff is booting. But I can’t get it to work although I did some studying of https://www.letscontrolit.com/wiki/index.php/Tutorial_Rules
Do you have some other sonoff-rules which you could share?
Hi Pedro,
Some improvements are always welcome.
1) I’ve changed the screenshot now.
2) The physical button will only trigger the “on button#state” rule, because those are used on the button device. Just try to get it working with only switching the realis and if this is working well, add the led command to it.
3) The states 0 and 1, we have to deal with it. it’s not as expected, you are right, that 1 should be ON and 0 should be OFF (it’s more logical). That’s how it’s programmed, so we have to deal with it. I don’t use the physical button at all, I just use the TurnOn and TurnOff command from my home automation setup. Even I don’t use the “SwitchSonoff” rule, because In my setup I’m not sure what the actual state is of the device. You can publish ofcourse the state of the Sonoff back to the HA system, well lots of options, but I don’t use it.
My rules contains at least one of the following and the led is acting as expected:
on button#state do
if [button#state]=0
gpio,12,0
gpio,13,1
else
gpio,12,1
gpio,13,0
endif
endon
4) In another post, I replied to a similair question, but this was related to the relay on system boot:
on System#Boot do
gpio,12,1 // Turn on relay during boot
endon
I think with the correct GPIO number this should be working for the led as well.
Maybe you can play with the example from: https://www.letscontrolit.com/wiki/index.php/Tutorial_Rules and especially:
I’ve checked all my 4 devices, but I don’t use any other rules currently. They all switch just 1 light and that’s it. Very basic and simple. I was curious about the stability of the devices and didn’t expect that such a device was working properly, even without rebooting (for now).
May I have to know how can I set the sonoff default power on when AC power connect? As because I have to use app to power on the fan after the AC discount and reconnect at sonoff every time. Please advise, thanks
Hi Benny,
My first question: why to switch off the AC power? To answer your question, it an easy solution to turn on the relay during boot.
Add the follow lines to the “Rules” section of the Sonoff:
on System#Boot do
gpio,12,1 // Turn on relay during boot
endon
I think you have the wrong image for the instructions on how to configure the push button.
Hello Bond Keevil,
For the 3 Sonoffs I’ve currently in use, the physical button on the device itself are working fine and will switch the in/output without issues.
Which image version are you using for this now?
Do you use the same rules?
Kind regards,
Rutg3r
Hi,
Nice How to !
For me it’s to use for this : https://www.npmjs.com/package/homebridge-sonoff-basic-espeasy
Do you know if it’s possible to flash the sonoff module with a Teensy++2 ?
Thanks,
Adrien
Hi Adrien,
Sorry, I don’t have any experience with a Teensy++2.
Regards,
Rutg3r
Hi,
I set up the same setup as you but when I press the button on it to toggle the light on or off, when turning off, the sonoff resets. Did you do something to disable the reset function on the button?
Hi Steve,
do you have another Sonoff so you can test if your settings are correct? I’ve read something similair and there was (almost) confirmed that the Sonoff was crashing after a certain action (sortof boot loop). Even a complete flash erase didn’t solved it. The user replaced it with a new one and here everything was running fine. Maybe you have bad luck and the device is broken?
Dear rutg3r nice how to!!
One question
When the flash says ok.
Only there is no esp-0 in the wifi after reboot.
Then is there something wrong i think.
I try and try every time the some flash say ok. only no wifi.
I reset the bord rx and tx jumper for 2 minutes..
Only cannot change anything..
Is there a other way to reset the board?
Or is there a way to test the board so it is not broken?
Thanks!!!!
Hi Dombo 71,
I’d never issues with SSID visibility, normally it’s just a matter of seconds the SSID become visible after powercycle. Are you using still the FTDI (USB) adapter for powering up the Sonoff? So after the flash just a quick unplug and plugin of USB port into the pc?
Even I never powered the Sonoff before configuring SSID on 230V, but it should be possible.
I’m not sure which firmware version you have tried, maybe try a different one. v120, v124 or v147 should be the stable ones. Even the Sonoff is running only on 2.4Ghz wifi, maybe that makes sense in the network scan to search for the SSID.
Regards,
Rutg3r
Hi Dombo71,
there is a fix check this: https://www.youtube.com/watch?v=hMN568beiYE
Sonoff Wifi FIX! No ESP_0 FIX!:
– DO NOT USE the esptool.exe/flash.cmd that come with the EASYesp software.
– Download and install the Arduino IDE : https://goo.gl/iWZyTM
– Arduino IDE Settings: https://goo.gl/QD1zw6
– Flash and profit!
Works for me =)
Thank you I couldn’t find this info anywhere!! Great tutorial 🙂
Thank you Peter. Yes indeeed, it’s really hard to find such a tutorial. I’ve found them partly on Youtube.
I case you have this Sonoff 4ch up and running with esp easy, please let me now.
Hi Rutg3r,
Does this also works with this device from sonoff?
https://www.aliexpress.com/item/2017-NEW-Smart-Home-Automation-WIFI-Switch-Sonoff-4CH-4-Gang-Din-Rail-Mounting-WiFI-Switch/32795684144.html?spm=2114.13010608.0.0.5li5PZ
thx
Hi Bas,
It looks like the esp easy firmware will work with the Sonoff 4ch as well. Please check the following topic:
https://www.letscontrolit.com/forum/viewtopic.php?f=5&t=2616&hilit=4ch&start=30
Supported hardware list for esp easy firmware: https://www.letscontrolit.com/wiki/index.php/ESPEasy#Supported_Hardware
https://www.letscontrolit.com/wiki/index.php/Sonoff_4ch
Its working,
I have flashed the sonoff 4ch esp 8285 chip with the esp easy v2.0 mega firmware and it works great!
(i used NODEMCU to flash!)
THX, Bas Spiek
Could you tell me where to download the sources?: esp easy v2.0 mega firmware
You mean here?
Tnx for notifying!! interesting device btw, maybe I’ll buy one soon too.
Nice tutorial… It worked for me..
Thanks a million for a great writeup! Sadly I’m having trouble with the toggle rule but otherwise this was a lifesaver!
The toggle rule is working fine for me with several Sonoffs. Actually, I’m using now the “TurnOn” and “TurnOff” commands, which is more accurate.
excellent step-by-step guide. This would be great on the ESP Easy Wiki!
Tnx Hans, I’ve made this tutorial from other similar tutorials and documented this especially for my setup. Sometimes I use my tutorial as well, because of the pin-outs 🙂
Hi,
how can I connect my sonoff th16, firmware 3.5.0, to a google sheet for downloading data?
Last year I used Simple Event Logger (GitHub) but today is discontinued.
Best regards
Luca